Hello everybody, I hope you’re having an incredible day today. Today, I’m gonna show you how to make a special dish, easy danish pastries. It is one of my favorites food recipes. For mine, I am going to make it a little bit unique. This is gonna smell and look delicious.
Easy Danish pastries is one of the most favored of current trending foods on earth. It’s simple, it is fast, it tastes delicious. It’s appreciated by millions daily. They are nice and they look wonderful. Easy Danish pastries is something that I have loved my whole life.
Easier than you think if you follow this Danish Pastry recipe for quick-method laminated dough. You will also love my Quick Method Croissants. Danish Pastry - the easy way to make Fruit Danish, Pinwheels & other breakfast pastries.
To begin with this recipe, we have to first prepare a few components. You can cook easy danish pastries using 22 ingredients and 10 steps. Here is how you can achieve that.
The ingredients needed to make Easy Danish pastries:
- Take For the dough:
- Make ready 200 g strong white bread flour, plus more for the work surface and the rolling pin
- Get 24 g granulated sugar
- Prepare 2 tsp (6 g) active dry yeast
- Make ready 3/4 tsp fine salt
- Take 200 g cold, unsalted butter, roughly cubed
- Take 1 large egg
- Make ready 60 ml cold whole milk
- Make ready 1 beaten egg, for brushing
- Make ready For the raspberry filling:
- Prepare 200 g frozen raspberries
- Take 100 g water
- Take 100 g caster sugar
- Get 1/2 tbsp. lemon juice
- Make ready 15 g corn flour dissolved in 30ml of cold water
- Make ready For the apple filling:
- Get 2 small dessert apples (200g when peeled and cored)
- Make ready 100 g water
- Take 70 g caster sugar
- Take 1/2 tsp ground cinnamon
- Get 15 g corn flour dissolved in 30ml of cold water
- Prepare 1 small handful of sultanas
This is a variation of classic Danish pastry. From this homemade pastry dough you can create a pastry braid or individual breakfast pastries. These flaky Danish pastries are a time-consuming project, but they're a perfect way to show people These glazed Danish squares are super quick and easy, great for potlucks. Turn the kitchen into your own little patisserie with this step-by-step guide to buttery Danish pastries.
Instructions to make Easy Danish pastries:
- The dough is made ahead as it needs to sit in the fridge for at least 3 hours and up to 3 days, I used mine after about 48 hours. The filling will last a good few days in the fridge too, so can be prepared in advance as well.
- To make the dough, mix the flour, granulated sugar, yeast and salt in the bowl of a food processor or a standing mixer with a paddle attachment. Add the butter and whiz to combine, it will not get incorporated in the flour but still be visible in the shape of small peas.
- Whisk together the egg, milk and 2 tbsp. water. Add the egg mixture to the flour mixture and fold it in with a spatula until absorbed – there’s no need to whiz it in the processor. Turn the dough out onto a piece of cling film, shape into a rectangle, wrap and chill for at least 3 hours, and up to 2 days.
- When you’re ready for the folding stage, roll the dough out on a well-floured surface, using a floured rolling pin, to a rectangle of about 20 x 40cm. With the short side facing you, fold the dough in thirds like a letter, bringing the top third of the dough down, then folding the bottom third up. If it sticks, throw some more flour at it and use a dough scraper to detach it. Rotate the dough 90 degrees. Repeat the rolling and folding process, then rotate the dough once more and roll and fold again. As you work, dust the work surface, your hands and the rolling pin with flour as necessary. Wrap the dough in plastic wrap and refrigerate for at least 1 hour.
- Repeat the entire three-times-rolling and folding process again – the dough should start to become smoother. If it’s still sticky, chill it for a bit longer. Wrap the dough and refrigerate for at least 3 hours, or overnight.
- To make the raspberry filling, place the frozen raspberries, water, sugar and lemon juice in a pan and bring to the boil. Simmer for about 15 minutes until the raspberries have broken down. Whisk in the corn flour mixture, stir in well and let it bubble for another 5 minutes until it thickens considerably. Transfer it to a bowl and cool completely.
- To make the apple filling, peel, core and roughly dice the apples. Place them in a pan with the water, sugar and cinnamon and cook for 15 minutes, like the raspberry filling. When the apples start to soften, mash them a few times with a potato ricer. You may well want to leave it a little chunky. Whisk in the corn flour mixture, stir in well, add the sultanas and let it bubble for another 5 minutes until it thickens. Transfer it to a bowl and cool completely.
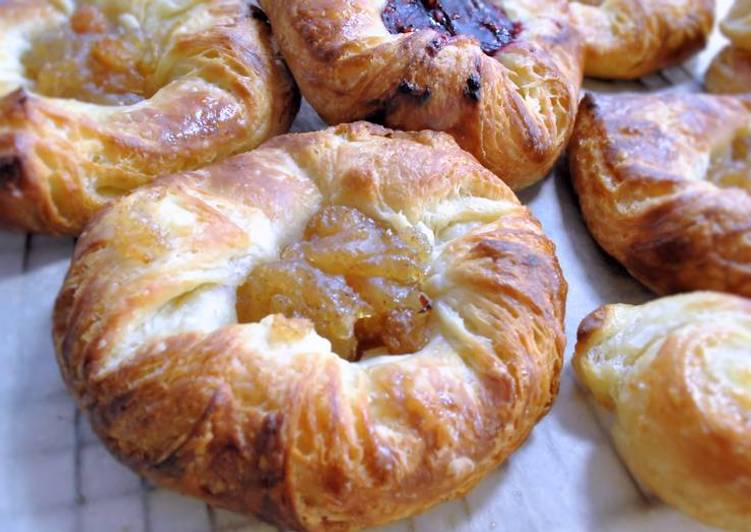
- When you’re ready to make the pastries, roll the chilled dough out to a 30 x 30cm square. Trim the edges and cut the dough into nine 10 x 10cm squares using a sharp knife or a pastry cutter. Brush the corners of each square with a bit of the beaten egg, then fold each corner into the centre and press down gently. Transfer the squares to 2 parchment-lined baking sheets. Cover them loosely with cling film or place in inflated plastic bags (just blow into the bag and tie the ends!) and leave to prove and puff up for 1 – 1 ½ hour.
- Preheat the oven to 200C/400F/gas 6. When the pastry has puffed up a bit, gently spoon a good dollop of the filling into the middle of each one (you can do it before proving but in case the pastries open up, the filling will get messed up). Brush the top and sides of the dough with the beaten egg and bake for 10 minutes. Reduce the heat to 190C/375F/gas 5, rotate the baking sheets if baking two at the same time and bake for further 7-10 minutes until golden brown.
- You can drizzle some icing over the pastries, made from 100g icing sugar beaten with 2 tbsp. milk, but frankly, those pastries don’t even need that.
A Danish pastry, sometimes shortened to just Danish (especially in American English), is a multilayered, laminated sweet pastry in the viennoiserie tradition. The concept was brought to Denmark by Austrian bakers, and has since developed into a Danish specialty. Danish pastry consist of several different things like the traditional A Danish, tebirkes, frøsnapper and However, luckily it is easier than it sounds. Actually, it is quite easy once you get the feeling of it. Pastry chef extraordinaire Catherine Adams shows how to make the ultimate breakfast treat, step by step.
So that’s going to wrap it up with this exceptional food easy danish pastries recipe. Thanks so much for reading. I’m confident that you can make this at home. There’s gonna be more interesting food in home recipes coming up. Don’t forget to bookmark this page on your browser, and share it to your loved ones, friends and colleague. Thanks again for reading. Go on get cooking!